 360 Exteriors LLC.
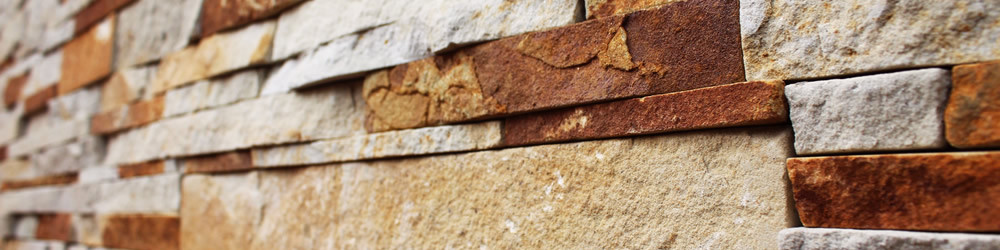
Rustic Elegance
Follow these eight steps to achieve the raw yet refined look of dry-stack stone accent around your pool area.
By Rebecca Robledo and Pool & Spa News

Stacked Stone Pool Accent
Dry-stack stone can be applied to just about any vertical surface and it look especially nice in the vicinity of your pool. Most designers prefer to use it as an accent on a raised seat wall, fireplace, bar or water feature. I think it looks great throughout the yard and definitely compliments your pool area.
You can offer several looks to your clients. One effect involves stacking stones that are 2 inches or less in thickness, but I personally prefer to mix it up more, using some stones that are as thick as 5 to 6 inches. You can also choose different varieties of stone to combine with the main species.
Dry-stack is very slow work, which makes it costly. Each setter tries to finish about 1 square foot an hour — less if they’re using mostly thin stone. Because of the considerable expense, most people limit its use.
A successful dry-stack craftsperson achieves three main goals:
Walk a line between natural and orderly.
You don’t want the project to look as uniform as brick, but it shouldn’t look random or thrown together either. The work has to fit in the confines of the wall. To maintain order, each piece of rock is made level and plumb.
Mix the rocks up.
A good blend of colors and textures should be the end result.
Keep the joints fairly short and tight.
Neither horizontal nor vertical joints should be too long because that can ruin the rustic look. Remember to keep the joints tight because you’re aiming for the illusion that there is no mortar holding the wall together. This increases shadowing along the surface.
Keeping these three principles in mind, use the following eight steps for setting dry-stack stone.
1) Select your rock at the stone yard.
Dry-stack works best with flagstone or other sedimentary rocks that break off in strata. This gives you a layered look. For waterfeatures, use harder varieties that can withstand chemically treated water. Just don’t forget that the harder the stone, the more time it will take to fabricate on site.
Choosing the best rocks is partly a science and partly an art. You want to make sure your selections have enough character and mix well with the rest of the stack.
Start by examining the edges. Because they have the most interesting color, texture and patterning, you’ll want to display this part of the stone on the face of the wall. Watch for pieces with different looks, so you can mix it up on the job.
Study the stone’s texture. Keep your eye out for interesting irregularities, which provide uniqueness and shadowing. Don’t go overboard, though. The stones will have to sit within the plumb line, so drastic bumps will require extra time for fabrication.
You’ll also want to observe the stone’s thickness, being sure to get enough variation. For example, you might think that Arizona flagstone would be ideal because it’s so consistent. In actuality, that type of stone has a bricklike uniformity you don’t want. Most of the stone should range from 1 to 3 inches thick, but we also combine small slivers with chunks that can get as large as 6 inches.
If you want to add more variety, mix in a different kind of stone to accent the wall in spots. Usually, I’ll stick with the same basic family, but choose a darker color or noticeably thicker pieces.
Finally, examine the whole rock to make sure the top and bottom surfaces aren’t wavy. The specimens can be bowed because they’ll be cut in strips 2 to 5 inches wide, so mild curves won’t show. But drastic waving will impact the strips. You want the thickness to be relatively consistent across the stone rather than tapered from one side to the other. That way, they’re easier to level as you set them.
Some quarries will palletize rock that is best for the dry-stack technique.
2) Establish your guidelines.
Dry-stack stone has a lot of character, but there should be a definite sense of order, too. This is accomplished by
establishing distinct boundaries. Set a story pole, a 2-by-4 at the top of the wall where you can pull plumb lines (2). Boards should go at the sides.
Decide how far you want the stones to protrude from the block wall or other structure. You’ll be working with pieces of varying depths, so it’s important to plan where to line up the front of each rock. Five inches is a good, workable setback because it gives you more latitude for dealing with wider stones.
If space is too tight, 5 inches may not be possible. In such instances, the project will take longer to finish. That’s because you may need to saw each piece individually to make it shallower. Many varieties of stone shatter if you try to snap them off into strips less than 4- to 5 inches.
3) Cut the rock into strips.
If you do this stage right, you’ll have plenty of color and texture to showcase on the wall. If not, you can waste the most interesting part of the rock.
When cutting a piece of flagstone (3), make maximum use of the edges. This is what you want to showcase on the front of the wall. To do this, cut around the perimeter of the stone so the edge surface is on the front of all of your strips. Then cut the interior pieces into strips. Those will be more consistent in color and texture, and make good filler. Remember, don’t merely cut the flagstone plank from one end to the other. If you do, the color and texture variation on two sides of the rock will be hidden.
Get a feel for how thinly the rock can be split. When working with harder varieties, you’ll need to produce wider strips — say, 4- to 5 inches. If you try to cut a rigid material too narrow, it will shatter.
4) Put down the mortar.
Mortar goes on the foundation before you place the first course of rock.
Start with a good mortar. Don’t use a sand that’s too coarse.
Instead, stick with a finer type, such as dry plaster sand. This provides better hold in the tight joints.
Put enough mortar to hold the stone down and also to backfill the void between the stone and structure (4). The mortar will be thinner in front, and considerably thicker in the back.
Sometimes you need almost wafer-thin or pie-shaped pieces to fit into a given space. Consider using thinset for these pieces because they’ll hold better.
5) Choose a piece that will fit — or make it fit.
While it doesn’t look like it, you are actually setting the stone in courses. Base your work around the larger stones: If you have a 6-inch-thick piece, for example, stack thinner ones on either side until they meet up with the larger specimen.
From the beginning, choose strips of differing lengths and thicknesses so it doesn’t look too refined (5A). With each fresh stone, select a new size, color and pattern. Don’t concentrate similar tones in the same area. Set thin rocks next to thick ones and long stones over short ones. That way, you won’t have continuous joints running vertically or horizontally. Avoid using too many stones longer than 1 foot.
In a perfect world, the ideal piece would fit precisely. However, this is not always the case. You might need to saw a strip so that it’s a little narrower from side to side or shallower from front to back. It helps to chip pieces a little in the front to add texture (5B).
Curves and rounded corners are a minor complication. You can use some smaller, wedge-shaped pieces to make rocks fit around bended areas (5C), but be sure to use some longer pieces as well, so the spot matches the rest of the work.
If you’re having trouble finding enough rock that naturally curves around the front, create a rounded area by chipping two corners off to break the straight line. This is well worth the time it takes because it makes the curve look like the rest of the job.
6) Finish setting the rock.
Tap the stone so it’s set firmly in the layer of mortar, leaving a joint only about 1/8-inch thick.
Use a level with each stone to make sure it’s even and plumb (6A).
Remove any evidence of mortar. First wipe any excess oozing, then, after a few stones are set, gently rinse the face (6B) to pull out any mortar in the front and recess the joint. Now you have shadowing where you would normally see a grout joint.
7) Wrap it up.
When doing this work, you always have to think a step ahead. This becomes even more important when nearing the top or ends of the wall. At this point, start anticipating how the final rocks will fit. They all have to end at the same spot, but you can’t break from the random-looking pattern as you get close to finishing. Start figuring out where a big piece and several smaller ones will work best. Otherwise, you may back yourself into a corner.
8) Seal it.
When the job is finished, use a penetrating sealer to make the stone more durable. This especially helps with softer stone. Apply at least two coats. More should be used if the rock will be exposed to chemically treated water.
THE BIG PICTURE
A dry-stack project won’t come together without considerable planning. Ask clients if they want thinner or thicker rock, or a combination. Decide if a particular tone should dominate and what color proportions are best — maybe 30-percent pinkish rock with yellower stone taking up the rest.
After selecting color combinations, explain it to your setters. Have one setter do a small sample to make sure everyone’s on the same page. Make the needed adjustments, then show it to the rest of the crew. During construction, have the setters step back and examine their work from a distance to make sure they’re maintaining the same look.
As mentioned in the story, sometimes I use a few pieces that are noticeably different from the rest. They might be significantly larger or from another variety of stone. It’s a good idea to randomly mark on the wall approximately where these specimens should go so they’re scattered how you want.
Each setter will have his or her own style. If you’re using multiple people on a job, don’t let them work in the same spot for too long. Instead, have them move after finishing a couple of square feet. That way, you won’t see an obvious difference from one part of the wall to another.
Jeff Thiessen, president of Thiessen’s Custom Masonry, is a 40-year veteran. Pool & Spa News also would like to thank Elias Castillion, foreman of the Murfreesboro, Tenn. company, for his assistance.
Call 360 Exteriors of Las Vegas today for a free consultation on your upcoming pool build – (702) 966-0138.
Our ability to listen, communicate, and pay close attention to details, is the catalyst required to bring your vision to life. The design process is exciting and fun from the initial design phase through the finishing touches like landscaping. 360 Exteriors looks forward to sharing this time with you.